How I built my Personal Blog - Enabling GitHub Flavoured Markdown & Code Syntax Highlighting - Part 3
Welcome back to the third post in my series covering how I built my Personal Blog site with Next.js 13 and Contentlayer. In the last post we covered how to enable MDX and how we can style the generated content if you want you can read my last post here.
In this post we are going to explore enabling two more of the promised features from the first post; GitHub Flavoured Markdown (GFM) and Code Syntax Highlighting. Also since my last post Next.js 14 has been released, so along with what's already been mentioned we will be covering how our blog can be updated to v14 of Next.js.
As always if you want to follow along at home, the full code featured in all of the examples in this series of posts is available on my GitHub DrBarnabus/next13-blog.
This is the third part of a series of posts on this topic, if you want to checkout the last part you can find it here.
Upgrading to Next.js 14
When I initially started this series of posts (and my own personal blog project) the latest and greatest Next.js was v13. Since then Next.js Conf 2023 happened and Next.js v14 was released but to be honest it doesn't change much in the context of this series about creating a blog.
If you are interested in updating your blog built following this series to v14 then it's quite simple. Just run the below
command using the package manager of your choice, personally I use yarn but you can also use npm/pnpm:
yarn up next react react-dom eslint-config-next @types/react @types/react-domWith that one change we should now be using Next.js v14 🥳🎉 just run yarn dev to start your development server
where everything should be working just like it was before but now in v14!

If you still have experimental.appDir in your next.config.js also make sure to remove that as well
otherwise you will receive a warning in the console on start.
If you have any issues you can refer to the Next.js 14 upgrade guide but most users shouldn't have any issues upgrading.
Enabling GFM (GitHub Flavoured Markdown)
If like me your first introduction to Markdown (.md) was GitHub then you should already be very familiar with Github
Flavoured Markdown even if you weren't aware you were using it. GFM was introduced to GitHub as early as 2009 and adds
additional support to markdown for formatting such as; Tables, Nested Block Content and much more.
So if you were missing these features while writing plain Markdown or MDX content you aren't alone. Luckily GFM was published into a formal spec and there are some great packages we can use to enable it in our project. In our specific case using Contentlayer is uses a library called remark under the hood, for which there is already an extension for GitHub Flavoured Markdown remark-gfm.
Install the required packages
yarn add remark-gfm@^3.0.1Using
remark-gfm@^3.0.1here as at the time of writing (03-11-2023)remark-gfm@^4.0.0doesn't seem to work with Contentlayer
Add plugin to the Contentlayer config
import { defineDocumentType, makeSource } from 'contentlayer/source-files';
import remarkGfm from 'remark-gfm';
export default makeSource({
  contentDirPath: 'posts',
  documentTypes: [Post],
  mdx: {
    remarkPlugins: [
      /** Add support for GitHub Flavoured Markdown */
      remarkGfm,
    ],
  },
});
Confirm it's working
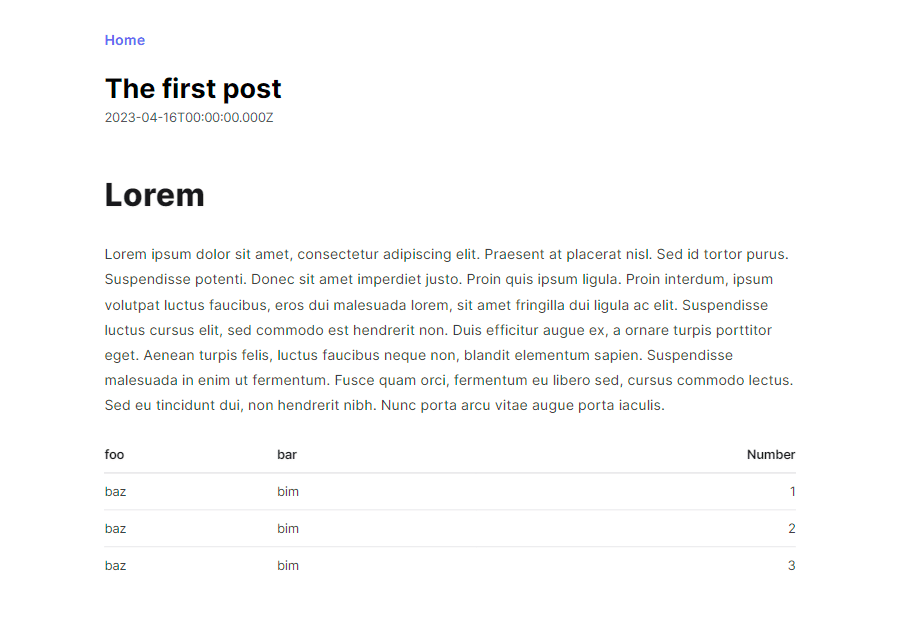
We can then confirm it's working by using a GFM feature that isn't natively supported in Markdown, let's edit post-01.mdx
and add a table to it using the syntax from GFM:
porta iaculis.

| foo | bar | Number |
| --- | --- | -----: |
| baz | bim |      1 |
| baz | bim |      2 |
| baz | bim |      3 |
And provided it's working you should see the following output on the rendered page, including the properly rendered table:
For examples of things you can do using GitHub Flavoured Markdown I would recommend reading the guide on GitHub's website.
Enabling Code Syntax Highlighting
What would a coding blog be without syntax highlighting, one answer hard to read and just plain boring... So how can we enable syntax highlighting on our blog if that's something that we want to do?
Again as we are using Contentlayer we ideally want a plugin that works within that ecosystem that can use to enable syntax highlighting and we have a bit of a shopping list of things that such a package should support:
- Language Support
- Performance
- Line/Word Highlighting
- Line Numbering
- Inline code highlighting
Fortunately there exists a package that provides all of this functionality! And on-top of that it's compatible with rehype which is the HTML processor used by Contentlayer. The package is rehype-pretty-code which is a plugin for rehype powered by Shiki that we can install for syntax highlighting of code blocks.
So let's get started enabling it in our project!
Install the required packages
Firstly we need to install rehype-pretty-code itself and shiki which is a peerDependency of the plugin:
yarn add rehype-pretty-code shikiAdd plugin to the Contentlayer config
Once the plugin is installed let's add it to our Contentlayer configuration, we're going to use two settings that are
different from the defaults. These are theme: 'github-light' which changes the default theme and grid: false
which disables some default styling so it's easier to override in a later step. We're also going to override
onVisitHighlightedChars so that the highlighted node receives the CSS class word.
import { defineDocumentType, makeSource } from 'contentlayer/source-files';
import rehypePrettyCode, { type Options as PrettyCodeOptions } from 'rehype-pretty-code';
import remarkGfm from 'remark-gfm';
export default makeSource({
  contentDirPath: 'posts',
  documentTypes: [Post],
  mdx: {
    remarkPlugins: [
      /** Add support for GitHub Flavoured Markdown */
      remarkGfm,
    ],
    rehypePlugins: [
      [
        rehypePrettyCode,
        {
          theme: 'github-light',
          grid: false,
          onVisitHighlightedChars(node) {
            node.properties.className = ['word'];
          },
        } satisfies Partial<PrettyCodeOptions>,
      ],
    ],
  },
});
With that added we can check it's working by adding a Markdown codeblock to one of our posts and checking how it looks.
In the following example you'll see a code block making use of some of rehype-pretty-code's formatting options
like; Title, Line Numbers, Line Highlighting and Word Highlighting.
```js title="tailwind.config.js" showLineNumbers {2-3} /require/
/** @type {import('tailwindcss').Config} */
module.exports = {
  content: ["./src/**/*.{ts,tsx}"],
  theme: {},
  plugins: [require('@tailwindcss/typography')],
};
```
Now if we look at our rendered page we will see that it does indeed work, however it's not very pretty as it's a completely unstyled codeblock:
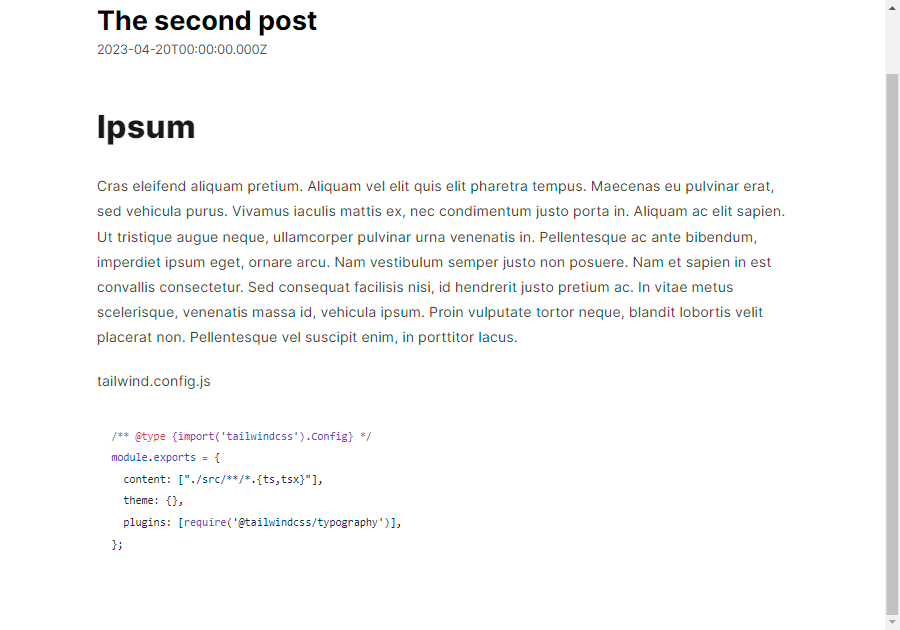
What would be nice is if the code blocks had some styling, it should be clear what is part of the code block and what isn't. Also you might've noticed that the features we enabled on the code block, namely line/word highlighting aren't working...
Styling our codeblock
That's because we need some custom styling, we need to define some styles for the code blocks to get them looking great.
There are a few styles that need applying to our codeblocks, to do that I'm going to be using the global.scss
file that's in our project. Since I'm using TailwindCSS wherever possible I'll be using @apply syntax to apply
styles to selectors. Here is the finished SCSS and below is an explanation of what it's doing:
/* Margin, Padding and Display */
pre {
  @apply m-0 p-0;

  > code {
    @apply mb-5 grid overflow-x-auto p-4;
  }
}

code {
  @apply inline-block rounded px-1 py-0 bg-zinc-50;

  &::before,
  &::after {
    content: none !important;
  }

  .word {
    @apply inline-block px-1 py-0;
  }


  /* Highlight lines/words */
  & > [data-highlighted-line], .word {
    @apply bg-zinc-100;
  }
}

/* Padding & Design for the Codeblock Title */
[data-rehype-pretty-code-title] {
  @apply w-full block rounded-t-lg bg-zinc-200 px-4 py-1 text-zinc-800;

  + pre,
  + pre > code {
    @apply rounded-t-none;
  }
}

/* Line Numbering */
code {
  &[data-line-numbers] {
    counter-reset: line;

    & > [data-line]::before {
      counter-increment: line;
      content: counter(line);

      @apply mr-4 inline-block w-6 text-right text-slate-500;
    }
  }

  /* Increase available space when the max number is 3 digit's long */
  &[data-line-numbers-max-digits='3'] > [data-line]::before {
    @apply w-8;
  }
}
The code above adjusts the spacing of margin/padding on the <pre> and <code>, sets some colours, styles
the element with the [data-rehype-pretty-code-title] attribute and displays the line numbers for code blocks that
have that feature enabled using a css counter.
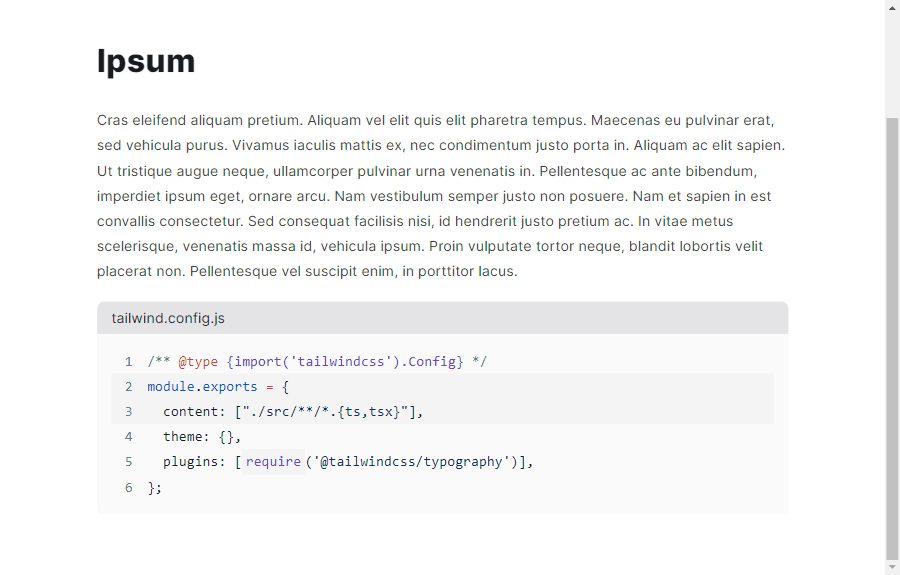
Now if you run our example, you'll see that it's much closer to what we want. It looks much tidier, however, it's not quite 100% yet. That's because some of our base styling for text is affecting our code block, and disabling that requires a bit more work.
Customizing the <pre> element
This is where our MdxContent component comes in just like we created an override for <a> we can now create
an override for the <pre> element in our MDX. Initially this will be just for styling but it means we can expand
functionality later on.
Let's start by adding the <pre> component with two alterations; We're going to add the class relative
to the <pre> element and using some basic TypeScript we are going to add the not-prose class to the parent
container of the <pre> element. So let's add that into mdx-content.tsx now:
function pre({ children }: React.HTMLProps<HTMLPreElement>) {
  const ref = useRef<HTMLPreElement>(null);

  useLayoutEffect(() => {
    ref.current?.parentElement?.classList.add('not-prose');
  }, [ref]);

  return (
    <pre ref={ref} className="relative">
      {children}
    </pre>
  );
}

export function MdxContent({ code }: Props) {
  const Component = useMDXComponent(code);

  return (
    <section className="prose prose-base prose-zinc max-w-none pb-4 pt-8 prose-headings:drop-shadow-sm prose-a:text-indigo-500 prose-a:no-underline hover:prose-a:text-indigo-300 hover:prose-a:underline prose-blockquote:border-l-zinc-300 prose-ul:my-4 prose-li:my-0 prose-li:marker:text-zinc-300 prose-hr:border-zinc-300">
      <Component components={{ a, pre }} />
    </section>
  );
}
But what is the not-prose class that we are programmatically adding to the container? It's a TailwindCSS class
that essentially negates the prose styling applied the rest of our Markdown document. With that added we now see
our completely styled codeblock rendered to the page 🎉
Adding additional functionality
Now we have our styled codeblock we can move onto adding additional features, for example you might want to implement a copy to clipboard function to your codeblock so that readers can easily copy code examples. As an example of such an enhancement let's add a copy to clipboard function to our code block:
function pre({ children }: React.HTMLProps<HTMLPreElement>) {
  const ref = useRef<HTMLPreElement>(null);
  const [focusWithin, setFocusWithin] = useState(false);
  const [hasCopied, setHasCopied] = useState(false);

  const getClipboardTextFromChildren = (element: React.ReactElement | string): string => {
    if (typeof element === 'string') return element;
    if (typeof element.props.children === 'string') return element.props.children;

    if (Array.isArray(element.props.children)) {
      return element.props.children
        .map((child: React.ReactElement | string) => getClipboardTextFromChildren(child))
        .join('');
    }

    if (typeof element.props.children === 'object') {
      return getClipboardTextFromChildren(element.props.children);
    }

    return '';
  };

  const handleCopy = async () => {
    await navigator.clipboard.writeText(getClipboardTextFromChildren(children as React.ReactElement));

    setHasCopied(true);
    setTimeout(() => setHasCopied(false), 3000);
  };

  useLayoutEffect(() => {
    ref.current?.parentElement?.classList.add('not-prose');
  }, [ref]);

  return (
    <pre
      ref={ref}
      className="relative"
      onMouseEnter={() => setFocusWithin(true)}
      onMouseLeave={() => setFocusWithin(false)}
      onFocus={() => setFocusWithin(true)}
      onBlur={() => setFocusWithin(false)}
    >
      {(focusWithin || hasCopied) && (
        <button
          className="group absolute right-2 top-2 flex h-8 w-8 items-center justify-center rounded bg-white dark:bg-zinc-700"
          onClick={handleCopy}
          disabled={hasCopied}
          aria-label={hasCopied ? 'Copied' : 'Copy code'}
        >
          {hasCopied ? <div className="h-6 w-6 animate-pulse">✅</div> : <div className="h-6 w-6">📃</div>}
        </button>
      )}

      {children}
    </pre>
  );
}
So what does the code we just added to the component do? Firstly we add some event handlers to listen for focus being on
the element and depending on if focus is within we show a button with a document emoji. Once this button is clicked we
extract the text of the codeblock using the getClipboardTextFromChildren function joining their contents together,
we then write this result into the clipboard and show a ✅ emoji for a few seconds to indicate that it was successful.
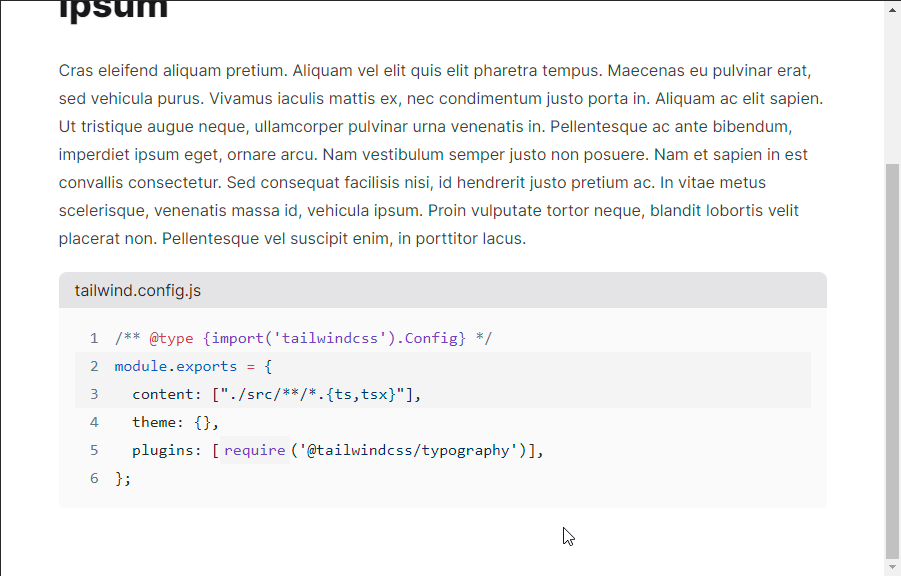
And with that we have a great looking codeblock with styling and some additional functionality on-top 🥳 as with a number of things in this series you don't have to stop here. The customizations you can make are only constrained by your creativity.
What's next for this series?
Well let's check in once again with our list of additional features that we could implement that we set out in Part 1 of this Series:
Supporting MDXProperly styling the generated HTML with @tailwindcss/typographySupport for GitHub Flavoured MarkdownCode Blocks with proper Syntax Highlighting and Copy to clipboard- Inline images with captions using @next/image
- Auto-linking headings
- Adding Metadata such as Title/Description/Topic/Tags both visually on the page and in the
<head>meta - Dynamic OpenGraph Image Generation
Going forwards I'm going to focus on a single topic for each post in this series, hopefully that should result in a more frequent schedule for each part being posted. I did promise in my last part that this part would include deploying the blog to Vercel, I think this post is long enough so I'm going to cover deploying the blog in the next part.
From there we can continue with the other topics in a more short form format, but hopefully much more frequently!
As always if your following along with this series and want to see a full working example of the snippets listed above this is available ony my GitHub DrBarnabus/next13-blog or feel free to checkout the code for my personal site which is also on my GitHub DrBarnabus/danielwoodward-dev.
Thanks for taking the time to read my post, I hope you enjoyed reading it! If you did I would greatly appreciate it if you shared it with your friends and colleagues.
Whether you did or you didn't I would love to hear your feedback; what works, what doesn't, did I leave anything out? Unfortunately I haven't implemented comments yet, but my socials are linked in the footer of this page if you wish to contact me.
If you liked this post, then you might also be interested in:
Enriching your NextJS 13 blog with support for MDX and styling the generated content with TailwindCSS Typography!
The process of how to build a blog with Next.js 13 App Directory, Vercel and Contentlayer. I'll be covering all of the details to get this setup and add some extra features!